Swim Drills: Do they really work? There are two mindsets among triathlon coaches: Drills don’t work vs. drills are a must. On the drills don’t work side, coaches teach frequent stroke corrections when working in person with their athletes. On the other side, coaches say: swim drills, when properly assigned to correct an athlete’s weaknesses and executed frequently are a critical pathway to swim improvements. Ideally, a marriage of the two would be best: working with a coach regularly at the pool who then assigns specific drills to progress your swim from session to session.
Although I’d be happy to work with you in the pool, for this article, the focus is to offer a basic understanding of the key positions and coordination of freestyle technique and twelve drills to strengthen areas of common weakness in triathletes.
Let’s start with some basic concepts to follow to get the most out of these drills:
1. It’s Critical To Know Why You’re Doing A Drill
And what part of the stroke each drill works to improve the whole stroke. The best sequence to follow is drill/swim/drill/swim, etc. This way you work on a specific piece, e.g. the high elbow pull, then work that piece into the whole. I had a client many years ago who went to work with a swim specialist for the off season. When we got back together in the spring to look at his swim, his drills were perfect! BUT, the whole stroke was not much improved after months of work. Put your energy into improving the whole stroke.
2. Basic Equipment Needs
It’s important that you can focus on improvement while drilling, not drowning. If you have trouble with your kick or tend to sink, use fins as a balance so you can focus on your technique and stay afloat. A snorkel can be very helpful too. With this tool, you can take the breath cycle out of the equation and focus even more on your technique. If you’re new to using a snorkel, give yourself some time to get comfortable with this tool.
3. To Kick Or Not To Kick
Many triathlon coaches teach from the no kick philosophy. Understandable when you want to save your legs and energy for the bike and run, especially for long course racing. But, if you want to have an efficient stroke, you need to have an efficient (or at least more efficient) kick. If your goal is to swim faster, you definitely need to kick hard when you’re doing your fast sets in the pool and for short course racing. The kick provides approximately 15-20% of the propulsion in swimming. Imagine going 20% faster! The pull produces the majority of propulsion. Spend about 15-20% of your overall swim time working on kicking specific fitness, i.e. train your kick so that if you need it or want to use it, you have the fitness to support the increased oxygen demand and effort. You always have the option to not use your kick at all.
4. Get Out Of Your Comfort Zone!
Wonder why you’re not improving even though you’re doing drills regularly? Avoid mindlessly doing “some” drill because that’s what your friend always does; avoid doing the same drills over and over. Challenge yourself by doing the drills that strengthen your weak areas and help you be more efficient.
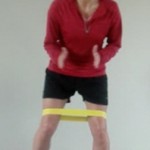
5. Dry Land Training
Consistent use of stretch cords or the Vasa trainer or Halo bench can be very valuable to improve strength and speed of motion with proper mechanics. And, it only needs to be about 10-30 minutes per session to see big changes.
6. Pool vs. Open Water
The majority of swim training takes place in the pool. But, it’s important to translate your swim improvements into the open water. First, we train like swimmers, then we train like triathletes.
12 drills to improve key positions in freestyle
1. Body Position: Jellyfish Drill
What does your body naturally do in the water? A body position that is low in the water or where the legs sink, increases drag, i.e. it makes it much harder to pull your body through the water. This drill only needs to be done a few times and it will give you a clear idea if your tendency is to sink or float or some combination. How to execute: in the prone position, start with a big deep breath filling your lungs completely. Next, drop your arms, let them relax toward the bottom, face in the water, then fully relax. Let your body go where it goes. Does it drop to the bottom? Does your body float on the surface? Do your legs drop? If you tend to sink, you will need to work harder to stay on the surface as well as move efficiently through the water. No equipment necessary, but can be done with a snorkel. Note on head position: relax your neck and head into the water so the water line is at your hairline or slightly higher. Avoid “burying” your head or artificially lifting it.
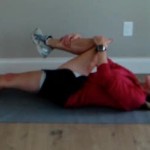
2 & 3. Core Connection, Kick, & Hip Drive Vertical Kick & Prone Kick Rotation
These drills work on kick efficiency and connecting and coordinating your legs to your hips, core and shoulders for improved coordination and supporting good body position and a better pull. Pro tip for the kick: kick from your hips, not just your lower legs. The down kick is when the top of your foot and front of your thigh push down on the water with a slight bend in the knee. The up kick is when the bottom of your foot and back of your leg push up on the water; push up from your glutes with a straight knee.
The prone kick and prone kick rotation are best done with a snorkel and fins (unless you already have a good kick). The main point is to gently rotate your hips (not excessively!) but in a steady rhythm up towards the ceiling and down towards the bottom of the pool – 25-35 degrees of rotation is enough, more only if your strength and mobility can support this movement. Focus on kicking and rotating from your hips; relax your shoulders and they will naturally rotate as a result of the hip focused rotation. Use snorkel & fins as needed. The main takeaway is to drive your shoulder rotation and arms from your hips and core. Do this drill for short distances to start: 12.5 or 25 yards/meters alternating with the full stroke. Incorporate an efficient kick and hip/core drive into the whole stroke: drill/swim/drill/swim, etc. Here are a couple of YouTube videos to help you understand these drills:
Vertical kick with hip rotation
Prone kick rotation
4. Breathing/Breath Cycle: One Goggle In The Water
If you struggle in the swim, breathing efficiently (a survival instinct!) can be very challenging. The whole stroke then centers around the need to get in as much oxygen with each breath as possible. In order to swim more efficiently, work to forcefully, consciously exhale with your face in the water. To inhale (the deep exhale drives the inhale), quickly turn your head to the side with one goggle still in the water to take a strong, forceful, quick inhale. For novice swimmers, the head rotation will follow your body rotation. For more advanced swimmers, try to separate the head and body rotation. Work on getting your head to “beat” your hand back in the water. Your head will rotate back in the water before your body. This decreases drag forces overall and improves propulsion with the non-breathing side arm. At first, work on the one goggle drill at easier speeds and shorter distances, such as during warm up and cool down. Then gradually work on this skill at faster speeds and longer distances.
5 & 6. Hand entry, Path Of Pull, & Recovery: Armpit Tap, Hand Entry Drill
The hands enter the water thumb first, at a slight angle, with arms reaching directly above the shoulders at the 11:00 and 1:00 position on the clock; shoulders internally rotated. Make a slight bend at the wrist into flexion, then the elbow bends and pushes toward the wall in front of you to engage the high elbow (HE) or early vertical forearm (EVF) position. Palm is aiming toward your hip pocket, moves past the hips as they rotate, then into the finish part of the arm stroke. For the recovery, the elbow bends toward the ceiling, rotates around to start the cycle again.
For the armpit tap drill, as your arm recovers, tap your armpit to accentuate the high elbow position. For the hand entry drill, think of pushing your hand into the water or simply releasing your arm and hand to finish the recovery and start a new stroke cycle. These drills don’t require any special equipment, but fins can be helpful to help focus on these aspects of the recovery. Practice as drill/swim/drill/swim, etc. by 12.5 or 25’s.
YouTube examples:
Armpit tap
Hand entry drill
7. High Elbow Catch & Pull: (Includes #8) Lat Activation & Feel For Water – Fist Drill
The most propulsive part of the stroke is a strong, efficient pull using the high elbow (HE) position. Keep in mind that high elbow means elbow above the hand also called the early vertical forearm (EVF). If you push your elbow up toward the surface, this will cause “slippage”, a loss of purchase on the water for an effective pull. For a strong pull, your latissimus dorsi (lat) muscles, located on your back just below your shoulder blades, need to be doing their job. For lat activation, you can practice this on a table, the pool deck, laneline, etc. With a straight arm to start, then moving to a bent elbow, press on the hard surface hard enough that you could move your body, done as an isometric contraction to activate your lats. Reach under your arm and gently tap on your lats while you are doing this so you can really feel them working. Once you feel them working, then swim a few laps really focusing on engaging your lats through the pull. If you finish your swim workout and your lats are aching, this is a good thing! You can try the fist drill (normal stroke with hands closed into a fist) to really emphasize pulling with your lats, not just your hands. Practice as drill/swim/drill/swim, etc. by 12.5 or 25’s.
8. Sculling: Front, High Elbow, Finish
Sculling drills can be challenging, but they are very valuable in helping you get a better feel for the water and improving your strength and propulsion from your HE catch and pull. Sculling is a figure eight movement with your forearms; it’s basically what you do with your arms when you’re treading water. It can be done in 3 positions: front, HE and finish. This is a drill best done with a pull buoy and snorkel. You won’t move very fast across the pool, but you want all the forward propulsion to be from your arms, not your legs. This is one indication you’re doing it correctly. There are a couple of video clips below that will be very helpful, please watch them if you’ve never done these before. Practice as drill/pull/drill/pull, etc. by 12.5 or 25’s.
Front Scull
Overall sculling
Front to back sculling
9 & 10. Finish: Finish Drill & Thumb Scrape
The finish part of your pull, as your elbow straightens, just before the recovery, is the second most propulsive part of your pull. For the finish drill, you hold your arms at your sides, bend at the elbows to about 90 degrees, then push your hand straight back, palm moving past your hips, then facing the wall behind you (wrist extension). This can be done with snorkel & fins. For the thumb scrape drill, swim normally, but scrap your thumb against your mid to lower thigh as you finish your stroke. Practice as drill/swim/drill/swim, etc. by 12.5 or 25’s.
Finish drill:
11. Pulling It All Together One Arm At A Time: Single Arm Drill
The single arm drill can cover a lot of ground with your stroke. There are 2 variations on this drill: non-stroking arm in front and non-stroking arm at your side. They are both beneficial, but keeping your non-stroking arm at your side is more challenging and ultimately pulls the key movements together by focusing on one arm at a time. This drill can be done breathing into the stroking arm OR breathing into the non-stroking arm. You can focus on several different aspects with this drill: arm entry, recovery, connecting kick with hips and hip rotation with shoulder rotation, working the breath cycle, checking your HE catch and pull, etc. Focus on one new skill at a time! Can be done with snorkel and fins. Practice as 12.5 or 25 left arm only, 12.5 or 25 right arm only, 25 or 50 both arms together.
Single arm drill
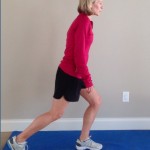
12. Strength & Open Water Prep: Polo Drill
This drill is one of my favorites and it’s torture as well. Swimming with your head out of the water is not easy, but if you suffer from lack of strength and power in the water, this is super helpful. To execute, swim normal freestyle with your head above the water (eyes or chin). You are forced to kick harder and pull harder, thus providing an in water swim strength session. It can be done with fins if you have a weak kick. To practice, if you’re new to swimming, start with 10 strokes polo/20 strokes relaxed stroke, etc. working up to longer and longer polo drill sections. Not only will you get stronger and faster, but you’ll get a real feel for what it feels like to lift your head too high when sighting in open water. All good prep for open water swims.
Polo Drill: